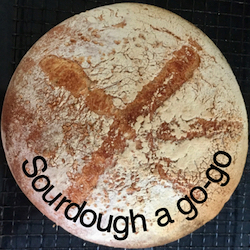
Bread – Sourdough a go-go

Sourdough a go-go? Easy
Imagine a calm Scottish seascape, Grasshopper, and lose your anxiety, it’s sour dough, a go-go, time …
This is a quick guide for my pal Bob to help him make a sourdough loaf using a proven method.

the aim
This approach is designed to save time. Key pointers and stages are covered in the headings as you’ll see.
Assumptions a go-go
At this stage I’m assuming you have a sourdough starter available and it has been at room temperature for a couple of hours. If you’re in a cold environment you can use a warm area to let things warm up or allow more time.
Equipment
You’ll need the following:
- 2 mixing bowls
- set of scales
- mixing jug
- working surface
- measuring spoons
- cling film
- wooden spoon
- pizza-stone
- cooling rack
Ingredients
You’re will need the following ingredients:
- sourdough starter – 110 ml (3.7 fl oz)
- water – 200 ml (6.8 fl oz)
- strong flour white/brown – 400 gm (14.2 oz)
- salt 1 tsp
- elbow grease
1. Prepare the dough
- measure 200 gm of flour into a mixing bowl (wholemeal or white is up to you – 50/50 works well)
- measure 110 ml of starter and 200 ml of warm water into a jug and mix together
- add mixture to flour in mixing bowl
- mix well
- cover mixture with cling film
- move to warm place for approx 6 hours or even overnight
==== 6 hours passes by ====
- measure 200 gm of flour into another bowl
- add a quarter teaspoon of sugar and a teaspoon of salt
- mix dry until you’re happy the salt, sugar and flour are well mixed

BUBBLING BREW - remove cling film – obvious, but what the hell …
- add dry flour mix to the bowl and stir together using wooden spoon handle
- rub oil (olive, rapeseed, other) on hands – you don’t need too much – stops dough sticking
- work dough in bowl – until it comes together in a ball – most of ingredients absorbed
2. Work dough
- sprinkle flour on a smooth working surface
- put dough ball on floured area
- knead (for 10 minutes) squish, stretch, fold, roll, punch and so on, turn 90 degrees regularly. As you work it the dough will smooth and become putty-like, waxy. (there is an alternative method called ‘stretch and fold’ contact me if you want to know more)
If the dough feels sticky and clings to your fingers …
- sprinkle flour on the dough (repeat until absorbed) and the dough becomes a smooth ball.
3. Rising a go-go
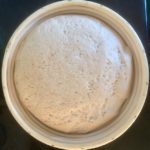
The images show the rise. The rising in this case uses a ‘banneton’, a French basket for raising bread.
- Flour the banneton, rubbing dry flour over the inside
- Drop the dough in it
- Leave aside, covered in cling film, until it rises
- Over night is fine, longer if it’s cold
Prepare pizza stone
- lightly coat the centre with semolina or cornmeal (stops loaf sticking to surface and has nice feel when baked)
- put dough on it – turn banneton over and bang it on the stone and (if you’ve floured the banneton enough) the dough will fall onto the stone.
- cover with lightly oiled cling film
- move to warm place to rise a wee bit more for 2 – 4 hours
You can also use a bread tin, but that’s another story…
4. Bake Bread
Note: oven will be heated from cold no pre-heating required, with pizza stone and dough inside
- place dough on pizza-stone to work surface
- remove cling film
- slash surface with fine bladed sharp knife. Slash deep, but with care.
- don’t be hasty.
- place in oven centre.
- add 100 ml (3.4 fl oz) water to small baking tin. The water will turn into steam and help crisp the crust
- place small tin on shelf below loaf.
- set temperature to 190 degrees C (375 F)
- bake for 50 minutes (check every so often after 35 minutes)
- check colour is golden and lift onto a suitable surface for a hot pizza stone
- test loaf holding on thick towel
- tap base listen for hollow thumping sound

If you’re happy with the hollow sound, pat yourself on the back and place loaf on a cooling rack. If you like a softer crust, wrap in a clean tea towel. Some say you shouldn’t slice bread until it’s cold.
Me, I give it 15 minutes and then butter a slice
If you want to know how to make a starter, use different techniques and so on get in touch. There are Soda Bread and Tattie Scone recipes via these links.
Like anything else, practise and thought will give you results you’ll like. Enjoy.
© Mac Logan


Thanks so much Mac!!!
I went shopping yesterday for baking supplies and am getting ready to
have it all come together with the yeast starter…
Bob
You’re welcome, Bob, I hope the baking goes really well.